Saturday, October 12, 2013

A Diamond in the Rough

For several years I have been driving by a simple little house near St. Peter, MN just across the Minnesota River. It always catches my attention and I have wondered how old it is, who built it, who lived there and how has it survived.  It is a small, simple building that looks to be a typical example of the first generation of houses built during the settlement era in the upper Midwest.  Although houses of this sort used to exist by the thousands in Minnesota, very few have survived unaltered.  This Fall I finally got my courage up and decided I would introduce myself to the owner.  Adjacent to the old house is Nelson Imports, an auto repair shop specializing in Mercedes. I introduces myself to the owner Josh Nelson who graciously showed me his interesting building.

The mystery house near St. Peter, MN. 
As you can see there isn't much to the house. It is in good condition and hasn't been cut up or altered to the point that the original structure can't be easily identified. The earliest part of the house is the section on the right with the front-facing gable.  The addition on the left was added a few years later, most likely as the family grew and separate kitchen space was needed.  Josh knew that the house had been lived in up into the early 1960s and that it has been vacant ever since.  He also had heard that it had been used as the first railroad depot in St. Peter. Since I am fascinated by vernacular architecture like this humble little home and the stories of the people who lived in it, I couldn't help but offer to research the building's history.

Stay posted through the Fall as I start studying this little gem and learn all about its story!  


Plus, if your C Class needs brakes or the "check engine" light keeps coming on, stop by and see Josh at Nelson Imports in St. Peter and he will be sure to take good care of you and your Mercedes. 

Sunday, August 25, 2013

Painted Floors in the Victorian Home


Late 19th century card of sample
floor colors from the New England
Paint Company

For more information about historic paint colors for your Victorian or Arts and Crafts era home or business, please visit the Historic Design Consulting webpage today.

Painted floors were common in American homes throughout the 19th century. Durable paints would seal soft pine flooring making them less liable to stain and easier to clean.  An 1850 edition of Miss Leslie's Lady's House Book recommends cleaning heavily soiled, common pine floors using:
        
   "an old tin pan with some gray sand in it; and after soaping the brush, rub on it some sand also."

Abrasive sand or pumice could remove stains but would also erode the soft, unpainted floor boards. Since painted and sealed floors would not absorb grease or stains, they could be easily cleaned by wiping or gently brushing with warm soapy water. 

Commercial, ready-made floor paints were made durable and glossy by the addition of resins that were otherwise used to make varnishes. These resins, including copal and colophony, were soluble in boiled linseed oil and turpentine and were added to oil paint to provided the hard, glossy coat.  Painters and homeowners also used regular, home-mixed oil paint and then applied a protective topcoat of varnish.  Alvin Wood Chase's 1890 receipt book (or recipe book as we say today) Dr. Chase's third, last and complete receipt book and household physician suggests: 


"Paint the whole floor with a mixture of much boiled oil and little ochre for the first coat: then after it is well dried, give two more coats of much ochre and little oil; and finally finish with a coat of first-rate copal varnish.  It is extremely durable for floors, windows, or outside, such as verandas, porticoes and the like." 

Painted bedroom floors from the 1855
Folsom House, Taylor's Falls, MN.
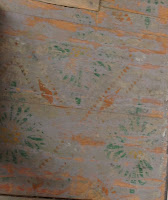
The Folsom House, an 1855 Greek Revival home in Taylor's Falls, MN, an early Minnesota lumbering town, features floors painted in a common, blue-gray and  a yellow ochre like that mentioned in Chase's recipe above.   


Close-up of Folsom House floor
stenciling.
Stenciling was a popular way to decorate painted floors to make them resemble expensive carpets or marble. Stenciled patterns often featured repeating floral or geometric patterns and sometimes included contrasting borders around walls which mimicked carpet borders. Stencils were made from tin sheets which had designs cut out with punches or shears. The stencils were laid on the floor and the paint brushed on leaving the painted pattern on the floor. The process was repeated until the floor was covered with the pattern.   The Folsom House has a few remnants of a repeating, bottle green floral design at the top of the stairway. Examples of  floor stenciling are rather uncommon today as they were often obliterated by foot traffic, removed when painted floors went out of fashion or destroyed when linoleum or carpet was installed. 

For questions or help with your own home's interior paint colors, ornament and period decorating, please visit the Historic Design Consulting Home Page for more information.


The Folsom House is located in Taylor's Falls, MN (about 40 minutes northeast of the Twin Cities Metro) and can be visited between Memorial Day weekend and September, Friday through Sunday between 1 and 4 and on holidays between 1 and 4.

Wednesday, January 2, 2013

Historic Paint Colors for the Victorian Home: Part Two


For more information about historic paint colors your your Victorian or Arts and Crafts era home, please visit the Historic Design Consulting website today! 

To view Part One of the Victorian Paint Colors post, click HERE.
In a previous post I described my process for selecting historic paint colors for 19th century homes and businesses.  Rather than relying on so-called “Victorian” color collections from modern paint manufacturers such as Behr or Sherwin-Williams, I use period color swatches.  This way I can be sure to consider the same colors homeowners did 130 years ago and offer my customers a truly authentic color palette.  In addition I also study the way house paints were mixed and tinted to understand better how the original colors appeared 

What is the process for selecting colors palettes for older homes?  First, I read what designers and architects wrote about house colors and fashion in the 19th century.  Andrew Jackson Downing, Samuel Sloan and many others wrote in detail about selecting paint colors and how they thought a paint scheme should be arranged.  By working my way through these primary sources I can get a good idea how Victorian homeowners and designers picked their color palettes.


Second, I need to know how paint was mixed.  When I read Downing's descriptions of paint colors such as drab or fawn it is essential to know which pigments were used so I can imagine how the paint might have looked.  Also, since painters tended to be a conservative lot who mixed paints using familiar recipes,  I can look at later color swatches to get some idea of older paint colors.  Learning about these paint recipes and pigments is a reliable way to reconstruct an early color palette.   

19th century paint was mixed using four basic ingredients: linseed oil; white lead; turpentine and pigments.  Many of the pigments used before 1875 were earth pigments, or pigments mined or refined  from soil.  In other words, earth pigments are pretty colored dirt.
  
Here are a few examples of pigments that were commonly used in the 19th century.


Indian Red is ferric oxide that was originally mined on the Indian Subcontinent (thus its name).  Other deposits of ferric oxide have been discovered all over the world and several have names, including English Red or Venetian Red, that indicate the place of their origin.  Since this pigment was relatively cheap, barns and industrial buildings were frequently painted with paint containing Indian Red. 

Raw Umber is also named after its place of origin: Umbria, Italy.  It is a medium brown pigment refined from clay containing ferric oxide and manganese.  Raw Umber was widely used in the 19th century. 


  Pigments could be baked in ovens to drive out water and cause them to darken.  Compare this Burnt Umber sample to the Raw Umber sample above.


Burnt Sienna is a limonate clay containing ferric oxide that was originally mined around the city of Sienna in Tuscany, Italy.  

Other pigments, such as Prussian Blue and Chrome Green, were commonly used.  Unlike earth pigments, these pigments were produced in factories.  Although found in many paint recipes, several of these manufactured pigments were fugitive, meaning they tended to fade or discolor in sunlight.  This is why few 19th century houses were painted bright blue or purple since these paint recipes usually contained fugitive Prussian Blue. 

Earth pigments proved to be durable and were widely used until the 1870s when they began to be replaced by brighter, more vibrant colors made from the by-products of the  petroleum industry.   This is why the bright, saturated colors commonly used in the early 1900s on Queen Anne homes look out of place on earlier Italianate and Gothic Revival examples.    

For information about color consults for your historic home, visit the Historic Design Consulting website and click on the House Colors button.

Monday, October 1, 2012

Making a 19th Century Door: Or, Why do Modern Replacement Doors Look so Strange on 19th Century Homes

There are many differences between woodworking in today's machine age and the 19th century.  Contemporary carpenters and furniture makers rely on drawings, dimensions, and precise measurements to help them plan and build things.  Before the Industrial Revolution, however, things were very different.  19th century house joiners certainly did rely on pattern books, but these books didn't contain measured plans with precise dimensions for Federal or Greek Revival doors, windows and moldings.  Instead, these pattern books had drawings of various elements with proportions. 

What do I mean by this?  Lets look at a 1797 plan book by Asher Benjamin and see.  If you wanted to build an interior door today you would buy a set of measured drawings for a 2/8, 2/10 or 3/0 door which would give you the standardized width of the stiles, bottom, top and lock rails, dimensions for the molding, etc.  If you look below at a plate from Benjamin's 18th century plan book, you will see that the drawings are far simpler.


Asher Benjamin, The Country Builder's Assistant
(1797)  plate 12.
The first thing to notice is the series of 9 marks beneath each door. Rather than dimensions, Benjamin instructs the joiner to divide the width of the door opening into 9 equal parts or steps of a divider.  If you are building a 3/0 door, which is 36 inches in width (as in the example Benjamin gives here), you would have 9 parts or steps of 4 inches each.  On the 4-panel door each stile, muntin and top rail is one part wide (or 4 inches), the bottom rail is 1 1/2 part wide (6 inches) and the lock rail is  2 1/2 parts wide (10 inches).   

The genius of this approach is its simplicity and flexibility.  If your door opening is an odd size like 2/9, 2/11 or 3/2 (as is common on older homes), you simply step off 9 parts on the door opening's width with a pair of dividers and there you have your base measurement.  You then use the dividers to lay out the width of the stiles (1 divider step or part), the dimension of the bottom rail (1 1/2 divider step) and so on until you have your stock ready to cut and plane.   Regardless of how wide or narrow the door, the proportions of each component to the entire door are exactly the same.  


What's better yet is you don't even need a ruler or to know the dimension of the opening.   You simply mark the width of the opening on a scrap piece of wood or story stick, use your dividers to divide it into 9 parts and start laying out your door.  The idea of not knowing or needing the dimension of a door is hard for modern tradesmen to wrap their heads around, but in the 18th and 19th century this was standard procedure. 


Ca. 1849 Greek Revival Door
Why is this important? These differences in approach explain why modern replacement doors often look so odd in older homes.  In an age where everything is standardized (e.g. the width of door stiles and rails), when modern shops build odd-sized doors for older homes the proportions of the door parts are usually off.  They just don't know the proportions governing the dimensions of the door's various parts and don't adjust their designs.


Whenever I visit an historic home I take careful measurements of doors, windows, molding and other millwork and determine the proportions of each piece. Then, if I make a hand-made door for a Greek Revival home, I can check the measurements and proportions for doors in similar homes and use them to make the replacement.  Not only does my replacement door have appropriate tool marks and construction for the 19th century, its proportions, molding and shape are also correct.

Saturday, March 3, 2012

Wall Plaster in a 19th Century Log Cabin

When we think about the American frontier, images of isolation, privation and strenuous labor can come to mind.  Life on the frontier certainly was difficult and dangerous.  A homesteader’s first year was often a frantic race to establish his family before the winter’s first snow began to fall.  The first job was to cut timber to clear land for planting crops and provide logs for building a cabin.  The homesteader's wife and children might stay with a neighbor or even remain back east while their new house was being built and crops and garden planted.  Conditions in their new log home were primitive as most cabins had only dirt floors, almost no furniture and only a small, cast iron stove for heat and cooking.  However, once established in their new home pioneer families were eager to improve their cabins with siding, wooden floors, paint and plaster.  Even on the frontier people did their best to follow the latest fashions and keep up with the Joneses.

German immigrants Wilhelm and Sophia Ney homesteaded along the Minnesota River just east of Henderson, MN in the 1850s.  Wilhelm built a large 22’x 32’ cabin from maple and basswood logs in 1855 which served as the family's home until he built a larger house out of the local, cream colored Chaska brick.  The old cabin was cocooned in board and batten siding and then converted into a horse barn after the family left. However, despite being used to stable horses for many decades, remnants of the original daubing and lath and lime plaster have survived on the rear wall.

Exterior of the Ney cabin showing half dovetail notching and board and batten siding.

The cabin's  interior showing the hewn logs and rafters and plaster remnants.

19th century plaster was made from lime, sand and sometimes animal hair and applied in up to three coats over wooden lath.  The plaster was mixed on site (the lime often coming from local deposits of limestone) and lath split or riven from trees felled in the area.  Wilhelm Ney split his lath from small branches of willow trees which were abundant along the nearby Minnesota River. The lath was nailed directly to the log walls with a straw backing which allowed the lime plaster to adhere more easily. 
Plaster remnants, willow lath and wooden pegs used to hold tack for the Neys' horses.
Close-up of the lath, plaster and straw.
Once the newly plastered walls had cured they could be white washed, painted with brightly tinted oil or kalsomine paint or even covered with fashionable wallpaper bought at the local dry goods store.   Indeed, some plaster, paint, siding and a new frame-and-panel door could make a log cabin look as refined as a frame house built in town.   Only its thick, log walls might betray its humble beginnings.

The Ney log cabin can be visited at the Ney Nature Center located just a few miles east of Henderson, MN along State Highway 19. 

Sunday, December 18, 2011

An Artist's Look at The Landing's Cabinet Shop

Every year The Landing, a living history museum in Shakopee, MN, celebrates the holidays by holding the Folkways of the Holidays. This event is held on weekends in December and shows visitors how Christmas and Hanukkah were celebrated on the Minnesota frontier during the 19th century.  My friends Kevin Alto, Dave Winter and I are always on hand to man the cabinet shop and demonstrate how woodcraft used to be done during the good ol' days. Dave, the shop's Scandinavian flat carver/instrument repairman/fiddler/bowl turner and general entertainer, has developed yet another talent: watercolors.  This weekend he captured the essence of yours truly as I busily worked away on a small hanging cupboard.  

Here I am at the bench cutting some dovetails on the cupboard's carcass.

Here I am "repairing" a 19th century glide rocking chair with
what appears to be a medieval battle axe
.
I think it looks just like me, though I usually only use my battle axe on larger projects.


Thanks Dave!  I've never looked better!

Saturday, November 5, 2011

Tin Cans and House Paint in the 19th Century

For more information about historic paint colors for your Victorian or Arts and Crafts era home, please visit the Historic Design Consulting Website today!


Once in a while a seemingly simple invention or discovery ends up having significant and wide-ranging consequences.  One example is the tin can.  Today tin cans are so common that we give them little thought, but after the Civil War they were a novelty that truly revolutionized commerce, diet and help bring about a consumer society.  Among the many industries that cans changed was the production and marketing of  house paint, as they made it possible for the owners of Victorian homes and professionals alike to buy ready-mixed and colored paints.

At the beginning of the 19th century house paint had to be prepared by mixing ingredients such linseed oil, white lead, turpentine, driers and pigments.  Some of these ingredients were often only available in bulk containers such as wooden casks or barrels while the coloring pigments had to be ground by hand. This made it difficult for homeowners to mix small batches of paint for jobs around the house.  However, during the Victorian era tin cans not only made it possible for professional painters and homeowners to buy smaller amounts of paint, the pre-mixed paint was of better quality.  Since canned paints were mixed in factories in bulk, the quality was more consistent.  Whereas the color and consistency of hand mixed paints always varied slightly depending on the amounts and quality of the ingredients, commercial, ready-mixed paints were uniform.  Commercial manufacturers used  pigments that were finely ground by mills so the colors were even.  National brands such as Sherwin-Williams and John Lucas & Co. tested their different ingredients so they could avoid adulterated pigments and additives that were common on the consumer market.    

The John Lucas & Co. of Gibbsboro, NJ was one of the innovators during the last half of the 19th century and was among the first to package house paint in tin cans.  Founded in 1852 by the Englishman John Lucas, the company developed new pigments, improved the production process of white lead and was a pioneer in prepared and ready-mixed paints. 

This can of Indian red paint from around 1880 is an early example of John Lucas's ready-to-use paint.  The soldered lid was removed with a can opener and the contents poured into a bucket.  Additional boiled linseed oil could be added to thin the paint and the professional painter or homeowner could brush it on the walls, ceilings and millwork.  Since the top was soldered, the can could not be resealed (Henry Sherwin patented the first resealable can in 1877) and all the paint had either to be used or the remainder stored in an airtight container.
A ca. 1880 paint can (still full of paint).


Top of the paint can showing its soldered lid.
Although this little can might not look like much, it represents a revolution in the way house paint and hundreds of other products were marketed and used during the last half of the 19th century.  Small innovations certainly can have large and lasting consequences.